|
|
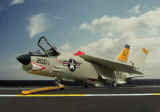
| F-8 H Crusader,
Monogram 1/48 |
| Modifications and
additions: |
|
- All panel lines engraved with rear of pointed scalpel
or sewing needle (all
raised kit lines sanded away afterwards).
- Ejection seat scratch (black and yellow handles "Fimo",
see page F).
- Windscreen and canopy formed PVC (see page C), frame and rear view mirrors added.
- Ailerons and flaps scratch (plastic filed to
appropriate thickness to fit wing and form flat wedges, laminated with thin
plastic sheet so edges protude a little bit); rear of outer wings filed/sanded to form sharp edges.
- Elevators filed/sanded to get sharp edges; same on
rudder.
- Details of wing fold mechanism added (see
page "raised wings")
- Navigation lights from clear plastic rod (see
page "lights")
- Main landing gear wells detailed according to photos.
- Cut out airbrake under fuselage, detailed fuselage
interior (criss cross strips) and made new brake (thin plastic sheet formed
over polyester form with a second holed part glued in)
- Detailed the fuselage opening under the wing by
scratch: To give the outer wall of the engine compartment something to rest on
I glued thin strips of plastic lengthwise in the fuselage halves so the
rounded part could simply be snapped in after the fuselage halves were joined.
Naturally there were front and rear bulkheads inserted first. Thin tubing
running along the engine cover by stretched sprue. Some additional detailing
according to a photo in "Squadron Signal F-8", the whole affair when finished
was painted white.
- The worst part: Corrugated front ends of wing and front
end of engine compartment. I tried everything and came out with parts of
embossed aluminum, which necessitated removing some material from wing and
forward fuselage to make room for the depressions; space between filled up
with putty, after this had dried the parts were snapped off and fixed
permanantly with CA glue.
- The landing gear was left as it is for the Crusader was
a pronounced tail sitter (contrary to some not so well informed modellers who
see a need to correct this).
- Entrance step: After fuselage rectangle was cut out a
piece of plastic of slightly larger diameter with holes at the sides was glued
to the inside; thin steel wire bent to form a narrow "U", horizontal part
sandwiched into thin top and bottom parts to form step; loose ends were then
glued into holes of plastic part.
- Painting with Humbrol enamels (this VF-62 F-8 had
a painted tail pipe indeed), decals for VF-62 were lousy.
Compared with the F-8 H from Hasegawa I'd prefer the
Monogram kit. It needs more work to replace the raised detailing but offers more
options, the Hasegawa offering having the usual grooves to show panel joints
which in the original weren't as prominent.
General
thoughts and tips for modeling see "Modeling ABC"